Tutorial Mengaktifkan Remote Desktop di Windows
1. Aktifkan Remote Desktop
-
Tekan Win + I → buka Settings.
-
Masuk ke menu System → pilih Remote Desktop.
-
Aktifkan opsi Enable Remote Desktop dengan menggeser tombol ke posisi On.
-
Jika muncul konfirmasi, klik Confirm.

2. Cek Nama Komputer atau IP Address
-
Tekan Win + R, ketik
cmd, lalu jalankan perintah:ipconfig -
Catat IPv4 Address (misalnya
192.168.1.2).
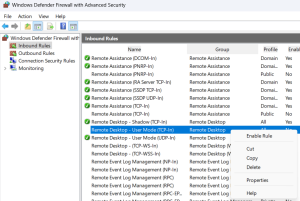
3. Izinkan Remote Desktop di Windows Firewall
Secara default, Windows biasanya otomatis membuka port 3389 saat Remote Desktop diaktifkan. Namun untuk memastikan:
-
Tekan Win + R, ketik
wf.msclalu tekan Enter → akan terbuka Windows Defender Firewall with Advanced Security. -
Klik Inbound Rules → cari Remote Desktop (TCP-In).
-
Pastikan statusnya Enabled. Jika belum, klik kanan → Enable Rule.
4. (Opsional) Membuka Port Manual di Firewall
Jika ingin membuat rule manual untuk port 3389 (RDP):
-
Buka Windows Defender Firewall with Advanced Security.
-
Klik Inbound Rules → pilih New Rule.
-
Pilih Port → klik Next.
-
Pilih TCP, masukkan port
3389→ klik Next. -
Pilih Allow the connection → klik Next.
-
Centang Domain, Private, dan Public sesuai kebutuhan → klik Next.
-
Beri nama misalnya RDP Port 3389 → klik Finish.

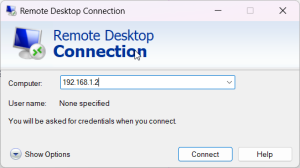
5. Akses Remote Desktop dari Komputer Lain
-
Pada komputer lain, tekan Win + R, ketik
mstsclalu tekan Enter. -
Masukkan IP Address / Nama Komputer target.
-
Klik Connect, lalu login menggunakan username dan password Windows di komputer target.